

Complete Guide to Water Timers for an Automated Garden Irrigation System
A tap/water timer installed at the start of an irrigation system eliminates the need for manual watering. Simply program regular water cycles by setting the times and frequency required for watering - perfect for if you are going on holiday or will be away from your property - no need to rely on the neighbours to keep your plants thriving!
Setting up an automated watering system not only saves time but also helps to conserve precious water resources and protect the environment by dramatically reducing water consumption for more sustainable garden watering methods.
A Quick Guide to Irrigation Control
Key features
Battery Operated Water Timers
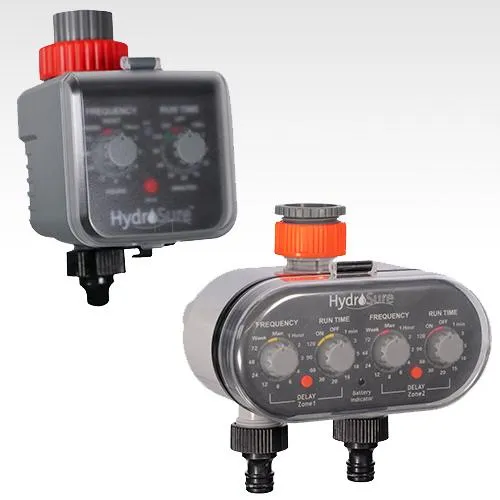
For irrigating smaller gardens with only one watering zone use the Hydrosure Single Outlet Timer.
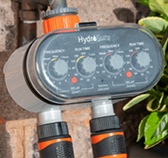
If you have a large garden and need to split garden irrigation into two watering zones, then the Hydrosure Dual/Multiple Outlet Timer would be more suitable for your watering requirements. The outlets should be programmed to work independently and at different times of each other allowing enough water flow to be delivered to each system at a time.

Dual Outlet Tap Timers are ideal for irrigating larger gardens with more complex layouts. For a more customised irrigation solution, use a battery-powered watering timer and enjoy the option to modify garden watering based on how many days a week or times a day you would like to run your irrigation system
Top Tip: These timers are extremely simple to set up in under 5 minutes. Try not to be put off by the number of dials and buttons on the face of the timer.
Mechanical Watering Timer
Additional Features

Mechanical Tap Timers operate without the need for batteries as they are powered solely by their internal mechanisms. These internal workings function similarly to an egg timer/countdown clock. To program, simply twist the dial to set the duration of watering time and the timer will automatically stop the water flow after the pre-set time has expired.
Most mechanical timers feature a manual setting meaning the faucet remains open allowing water to flow through the unit if you need to access the water source or use a hose pipe.

If you are looking for a timer with additional smart features specifically designed to conserve water and protect against water wastage, the HydroSure Dual Outlet Water Timer with Digital Display has a built-in internal sensor connection socket designed to allow for moisture sensors to be connected to the unit. This prompts the timer to skip watering on rainy days or when the soil is too wet.
The timer also features an Eco Function allowing you to split watering duration into smaller watering cycles for a soak time in between.
The Hydrosure Mechanical Timer has the additional feature, compared with other leading brands, of anti-slip comfort grips that ensure ultimate control even with wet hands.
This soak time waits for the water to seep into the soil before applying more on the top to prevent water run-off and ensure water goes exactly where it is needed – the plants' roots.
How To Set Up a Tap Timer - Installation Tips

Attaching a Water Timer to the Tap
Tap timers can be easily installed to the tap by hand with no tools required and still create a water tight seal with no leaks. Avoid using any tools to tighten the timer to the tap as this can damage the unit.
A tap timer may have a reducing nut connector already threaded onto the inlet. This functions to allow the timer to be installed on multiple sized taps. Top Tip: Most tap timers fit ¾” and 1” taps.
If the reducing nut connector is required for installation, begin by removing this from the timer and thread this onto the tap. The tap timer features a collar that spins independently of the unit. Use this collar to thread to the tap/connector without the need to spin the whole unit around and risk scratching or damaging it on the wall.
Tap timers can also be installed to a Water Distributor, allowing other watering accessories to be connected without having to disconnect your irrigation system. Most timers arrive with removable quick click tap connectors that can be unthreaded to reveal a male threaded outlet. This allows complete flexibility if you choose to connect the timer to a threaded male accessory, such as a Filter, Pressure Reducer and Barbed Tap Connector. This is especially useful looking to install the timer with LDPE Irrigation Pipe
Optimal Working Pressure
Tap timers work best at water pressures around 0.5 - 8 bar pressure. This versatile range of pressure optimisation means timers are able to run at low pressures for a micro emitter irrigation system and up to 8 bar for a more high powered sprinkler system. Top Tip: Some tap timers are able to work at pressures below 0.5 bar – the perfect solution when setting up an automatic plant watering system from a water butt.

Protect Your Water Source
Inserting Batteries

Attach a Back Flow Preventor directly to the tap before installing a water timer to avoid contaminating your water source.
Most Irrigation systems require a pressure reducer to function optimally, however, for best performance, the tap timer must be installed before the pressure reducer as pressure reducers are not designed to function under constant pressure from the tap being constantly on.

Battery-powered tap timers often have hidden inserts with water-tight seals that conceal the battery port. Don't forget to purchase Batteries alongside your timer.
Once you have installed the batteries, there is often a test indicated by the manual that allows you to check the tap timer is working. Often this test requires you to turn the run time knob to the ‘On’ position. This should trigger an internal motor to start within 10 seconds of turning this dial. If you can hear the motor running, then the tap timer is functioning optimally.
Top tip: If using a filter and a pressure reducer together be sure to install the filter before the pressure reducer. Pressure reducers are delicate items that require protection against debris build-up.
Turn the run time dial to off position before connecting to the tap.
Top Tip: If the unit does not appear to be working – check the batteries are working and are installed correctly.
How Does a Tap Timer Work?
Follow our Step by Step Guide to help program your water timer to custom irrigate your garden. Please note: Some tap timers may have alternative set up requirements, use the following as a guide only.
1. First determine how often and for how long you would like to water your plants. In Summer, you may wish to run an irrigation system twice a day – select 12 hours on the frequency knob and 20 mins for run time. The timer will begin watering immediately for the first cycle, then 12 hours after the dial has been set.
The below table is an approximate guide. These requirements may change based on plants in your garden, litres per hour output and weather conditions.

2. Throughout the seasons and as the weather begins to change, look to re-program the water timer by following the instructions in the manual.
To find out a run time most suited to your garden’s watering needs, start by running the system two or three times a week for 10 minutes. After each watering cycle, check water has penetrated the soil to a depth of at least 8 inches. The soil should be damp but not saturated. If the soil is still dry, increase the run time rather than the frequency.
Top Tip: Cover the soil in mulch or bark to avoid water loss through evaporation.
3. Timers work on a count down mechanism so in order to program when you would like the timer to begin watering, the timer will need to be set at that time. For example, if you would like your system to come on at 8am and 8pm every day, you would need to set this timer’s frequency to 12hrs at either of those times.
Some timers feature a delay button that allows you to postpone when this system begins. An especially useful tool if you want to start your system early in the morning or late in the evening.
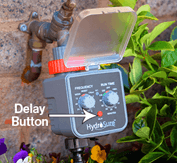
To delay start the water timer, press the delay button for more than 3 seconds until the LED light is on constantly. Each press of the delay button indicates a one hour delay. For example, if it is 8pm in the evening and you would like your irrigation system to come on at 4am, press the delay button 8 times.
4. For the first watering session, watch your system in action for the full run time to ensure water is fully soaking into the ground and there is no water run off. Keep an eye on this during drier or wetter times during the year to prevent any unnecessary water wastage.
5. Check the weather often and if it looks like it is going to be a wet week, switch the run time to off so no watering will take place after this time.
6. Finally, once your timer and irrigation system is successfully installed, remember to turn on the tap! The internal valve within the timer controls the water flow and will not allow water to flow through the system when not required even if the tap is left on.
Maintaining an Irrigation Timer
Autumn/Winter Protection for a Water Timer
At the end of a watering season, remove the timer from the tap, take out the batteries and allow any sitting water to drain away from the unit. Remember, batteries should be disposed of/recycled in line with local council guidance. When removing the batteries, ensure the timer is not turned upside down.
To prolong the life of a water timer, before the first frosts or before the temperature drops below 1°, place the timer in a garage, shed or any undercover area that is sheltered from damp. Be sure the timer is stored in an upright position to protect internal mechanisms from any water damage.

HydroSure Water Timers are fitted with a built-in mesh filter that can be removed for cleaning purposes. Keeping the filter clean is vital to maintain timer function and prolong the life of a tap timer by ensuring small particles do not cause blockages inside the valves which may hinder the function of your irrigation system.
Cleaning the filter will depend on how your irrigation timer is constructed. To retrieve the filter on most timers, remove the ring nut by unthreading it from the inlet of the timer. The cap can sometimes be completely removed from the unit and the filter retrieved from there. Often the filter might be built into the rubber seal which can be removed. Wash the filter in a bucket of water/under running water to remove any debris from the mesh. Remember to replace the filter back inside the tap timer.
Caring For Your System in Spring/Summer
Just before the beginning of a watering season, purchase new good quality Batteries compatible with the water timer you are using. A fresh set of batteries will ensure your water timer will work at its peak and last throughout the watering season. Avoid using rechargeable batteries as these tend to hinder the functions of water timers.
Most timers feature an LED light located at the front of the unit that can indicate the condition of the batteries. Most tap timers, for example, flash quickly or the light is constantly on if the batteries need changing. It is worth reading the instructions that arrive with your tap timer and become familiar with warnings the timer may give off if the battery is running low.
It is vital to maintain the timer by ensuring it’s batteries are in full working order as a battery fail could mean your system could be constantly on or may not switch on at all!
Top Tips for HydroSure Timer Maintenance
Hydrosure Timers have a water resistant outer layer that protects against rain water. The timer should only be installed above ground and should not be submerged under water as this will impair the internal workings.
If you are placing your timer in a position that might be susceptible to dust, algae formation or heavy rainfall, our HydroSure Dual Outlet Water Timer and HydroSure Water Tap Timer feature a flip-down cover with built-in UV protection.
Frequently Asked Questions

How long do the batteries last in an Irrigation Timer?
• At the start of every watering season, install brand new good quality batteries and remove the batteries at the end of the watering season whilst the timer is in storage. Depending on how often and for how long the watering cycles are set, the batteries should last up to 6 months without needing replacing. You may find that batteries may require replacement more often if your timer is set to water twice a day every day as this requires the timer to generate significant amounts more power to operate the internal valves.
• Each time the batteries are replaced, the timer will commence watering cycles from the time the batteries are changed. For this reason, change the batteries at the time you would like watering cycles to begin. Please Note: Water Timers will also wipe the pre-set program when it is switched to the manual function.
Top Tip: Internal mechanisms that start to make a lot of noise indicates the Timer requires a new set of batteries.
My timer has no clock, how do your set the time you want to water?
It is advisable to set your timer to water early in the morning or late in the evening. As most Irrigation Timers work off a count down mechanism, the user must wake up early to set the timer at the exact time they would like it to commence its first watering cycle. HydroSure has a range of Irrigation Timers with a built-in ‘Delay’ feature for ultimate convenience. This means you can set the timer at any time of day and activate the delay feature to program watering for the preferred time.
Are Tap Timers Temperature and Weather Resistant?
• Irrigation Timers are water-resistant however, during prolonged forecasted wet weather conditions, it might be worth disconnecting your Timer from the tap and irrigation system to bring it indoors. This prevents saturating the internal mechanisms that affect the longevity of your tap timer. Alternatively, a timer installed in a sheltered position or with a DIY protective canopy should be fine to be left out during such conditions.
• Bring your timer into a frost/damp proof shed or garage after the watering season has finished and before the first frost. Your Timer features complex internal mechanisms and valves easily damaged by cold weather.
Can the timer be installed horizontally or on its side?
For best results, install your Tap Timer to the tap in a position where the outlet is facing directly towards the floor. Installing the unit horizontally, on its side or even tipping it upside-down interferes with the direction of water flow and can cause damage to the internal mechanisms.
How do I know if my Irrigation Timer is working?
Most timers arrive complete with a test feature allowing you to check the unit is working. Often this requires you to turn the run time dial to the ‘ON’ position. If you can hear a buzzing noise and the LED light indicator is flashing green, the unit is working correctly.
Top Tip: Before going away on holiday, have your timer fully set up to irrigate your garden for at least a week beforehand. This will allow you to check the system is adequately watering your plants and is switching on at the required times.
My Timer has two outlets, can I run both at the same time?
A timer with more than a single outlet should have each outlet programmed to water at different times due to pressure restrictions from your water source. A large number of emitters on the same pipe run require more pressure than the output from your water source. A dual outlet water timer allows you to use the available water outputted from your tap to irrigate different areas of your garden at different times. This is also known as zoning an irrigation system.
Example: If the flow rate from your water source is 540 Litres per hour and you are using Stream Drippers that output 40 Litres per hour, you can use up to 12-13 emitters from each timer outlet (Flow Rate Divided by Emitter Output).
How do I attach irrigation pipe or hose pipe to my irrigation timer?
Hosepipe Connection: HydroSure Timers arrive complete with a male outlet tap connector for simple connection to a Garden Hose using a Hose End Connector. Use any size hose pipe and quick-click connector as the included tap connector is fully compatible.
Irrigation Pipe Connection: Most irrigation systems are built using LDPE Pipe. This is easily connected to HydroSure Tap Timers by replacing the included tap connector with a Barbed or Nut Lock Tap Connector with a ¾” female thread. HydroSure have a range of barbed/nut lock tap connectors to fit multiple pipe sizes - choose an irrigation pipe that best suits your requirements. Top Tip: HydroSure Timers are compatible with Irrigation Filters and Pressure Reducers – Further customise your irrigation system by attaching it to the male threaded outlet of your timer.
How can I stop my tap timer watering when the ground is too wet?
HydroSure have a range of Irrigation Timers compatible with a Rain Sensor. A rain sensor features built-in disks that absorb water and prompt your irrigation timer to skip watering on rainy days without having to manually re-set your timer. As the weather begins to clear, the disks dry out and the timer automatically recommences its pre-set programs. This water-saving feature prevents wastage and overwatering that is detrimental to plant health.

