

How to Design and Set up a Greenhouse Irrigation System
Greenhouse irrigation is vital to enhance plant growth and yield, follow this simple guide explaining how to build and install a DIY greenhouse irrigation system tailored to your plant’s consumption requirements allowing you more time to relax and enjoy your garden.
How much Water do Greenhouse Plants Need?
For reliable greenhouse irrigation that successfully provides water to all of your plants, be sure to create a plan outlining the shape of your greenhouse, where your water source is located, possible pipe network layouts and places you want to water.
Next, choose the emitters you would like to water your plants. Most commonly used in a greenhouse irrigation system are Micro Drippers or Stream Drippers for single pot watering, Micro Sprays and Micro Sprinklers for watering plants from overhead; whereas Soaker Hose and Drip Line are ideal for raised beds and greenhouses built directly on top of growing medium. Emitters with similar flow rates and pressure requirements can be installed together on the same pipe run - Ideal for flexible watering in more complex layouts with a variety of containers.
Top Tip: Purchase a row of Goof Plugs to seal any unwanted holes if you need to re-arrange the layout of or move the location of emitters.
Whilst choosing which emitter system to use, take into account how much water your plants need and group plants together inside your greenhouse with similar watering requirements. A greenhouse irrigation system allows you to keep track of how much water each plant is receiving however, in terms of plant health, there are some considerations to take into account. Even with a well-placed irrigation system, conditions inside a greenhouse such as extreme heat or humidity can mean water evaporates quickly resulting in underwatering or plants becoming over-watered due to wet and warm conditions exacerbated by the confines of a greenhouse.
Top Tips for Plant Health
• Check plants for visual signs of stress. Yellowing leaves indicate too much water whereas wilting indicates plants require more water.
• Soil that feels dry to the touch requires a longer watering cycle and soil that is over-saturated should be allowed to dry out before switching your irrigation system back on.
• During warmer and drier periods, add 20% more water either by lengthening the run time or increasing the watering frequency on your timer.
• In preparation for damp or humid conditions, install a Rain/Moisture Sensor to your tap timer prompting your timer to skip watering in such conditions.
Calculating Water Flow Rate
Now that you have decided which emitter system to use, calculate how many emitters can be run from the tap in a single length of pipe. Each emitter requires a certain amount of water before it can emit efficiently. The more emitters on one row of pipe, the less water is available for each emitter. Use the below calculation to work out the flow rate from your tap in litres and divide this figure by the litres per hour your chosen components emit.

Example Emitter System
A domestic tap that outputs around 9 litres of water per minute will output around 560 litres per hour.
Micro Drip: Install 65 – 130 drippers emitting around 4-8 LPH or 13-28 Stream Drippers emitting around 20-40 LPH (emitter output divided by 560 litres per hour from the tap output).
When using more emitters than the output from your water source can cope with, install these on separate runs of pipe, also known as splitting an irrigation system into zones. Use a Water Distributor to run each zone independently and at different times.
Top Tip: When branching off using Micro Pipe, 4mm Tees and Cross Connectors to create a row of emitters, be sure to only stem from the lateral pipe in lengths up to 4 metres.

Take into account that micro pipe can allow up to 60 litres per hour (depending on the flow rate from your outdoor tap) to flow from the tubing. To calculate the maximum number of emitters that can be used from a single run of micro pipe, divide 60 by the litre per hour output of the emitter.
Pipe Network for Greenhouse Irrigation
When designing a greenhouse watering system, decide if you would like an overhead sprinkler system, a drip system or both. The type of watering system your plants require will depend on how your pipe network should be set out. The most ideal pipe to use in a greenhouse watering system is 14mm to 18mm LDPE Supply Pipe. 4mm micro pipe should only be used to branch off emitters from the main LDPE rather than as the main supply pipe as the small internal bore reduces flow rate if run in lengths longer than 4 metres.
Greenhouse Drip Irrigation System
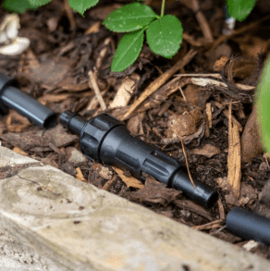
To begin, install a network of pipe around the peripheral of the greenhouse at floor level. Use Barbed Elbows to divert pipe around the corners, installing an End Cap at one open end of pipe leaving the other closest to the water source open for installation to the supply pipe.
Top Tip: End Caps maintain water pressure within the system and should be installed to plug any open end. Use a Fold Over End Stop or Control Valve for easy access to system flushing to minimise build-up or clogging inside emitters. Flushing should take place once a month during the watering season including one final time before the system is to be winterised. Replace the end caps after each flush to prevent insects from crawling inside the system.
Install Tee Connectors to divert pipe up the walls of the greenhouse and connect a Cross Connector at the height you would like the next run of pipe to be installed around the perimeter.
Repeat the same process taking pipe around the greenhouse border. Use as many cross connectors as you wish to create multiple rows of pipe. This multi-layering is ideal for plants that are situated at different heights or on benches as it allows for easy access of water from the emitters to the soil.
Top Installation Tips
• For increased water flow and to ensure the best performance from your emitters, try to install pipe in an unbroken circuit using as fewer end caps as possible. Instead keep water flowing by installing Tees, Elbows and Cross Connectors.
• Secure pipe in position using Greenhouse Support Hooks.
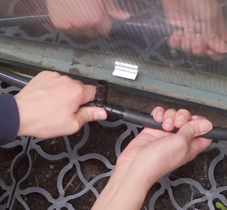
• Install a Ratchet Clamp at each barbed connection point to secure LDPE pipe in place and prevent pipe dislocation.
Overhead Greenhouse Watering System
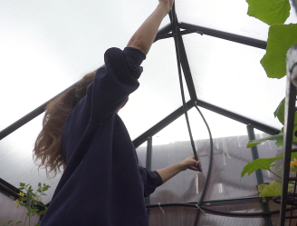
Depending on the size of your greenhouse, a small overhead system can be installed alongside a drip system already installed around the perimeter.
Branch off one cross connector outlet to direct the pipe up to the ceiling and divert the pipe along the roof structure using a barbed elbow. Independently operate the peripheral and overhead system by installing Barbed Valves to isolate water flow to the overhead sprinklers and at either side of a cross connector of each peripheral run of pipe.
Example Pipe Installation in a Greenhouse
How to Uncoil LDPE Pipe
How to Irrigate a Greenhouse
Flushing a Greenhouse System
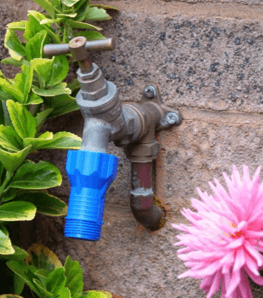
Attaching a Greenhouse Irrigation System to the Tap
Now that your pipe network is installed around your greenhouse, think about how you are going to supply water to it. This could be via a length of Garden Hose or LDPE Pipe. When using LDPE, use Barbed Connectors to navigate pipe to the greenhouse and join to the pipework using a Barbed Joiner or Elbow. Top Tip: Use Wall Clips or Saddle Clamps to attach the LDPE to walls or fence lines to keep it neatly tucked out of the way.
A simple alternative is to connect your garden hose pipe to the internal greenhouse pipe network. Use the below connectors to join a hose pipe via a Quick-Click Hose End Connector and Tap Connector to LDPE via a Barbed Director.
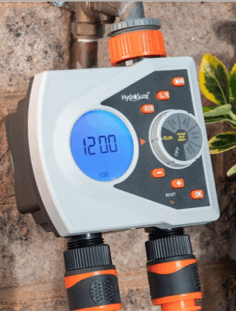
Before connecting LDPE or garden hose to the tap, you may wish to install a Garden Tap Timer. Automating greenhouse irrigation means watering run time and frequency can be easily controlled based on plant’s consumption requirements.
Choose a timer with an Eco Function built-in. The eco function splits the duration of watering cycles, pausing and recommencing watering allowing water to soak into the soil and reducing water runoff. Controlling water flow in this way promotes ideal soil and air conditions within the greenhouse that minimises the risk of disease and instead encourage your plants to flourish.
Overhead Micro Sprinklers and Spinnet Sprinklers operate at pressures around 2-3 bar whilst Drip Systems and Micro Sprays require a reduced 1 to 1.5 bar to function optimally. Install a Pressure Reducer after your irrigation timer to regulate pressure to the required level.
If using a combined system with emitters that function at different pressures, separate each system using a Control Valve or use a Tap Timer or Water Distributor with multiple outlets to split each system into zones. Top Tip: Try not to run emitters with different pressure requirements on the same pipe run as this distribution reduces the performance of the system. Too much pressure within a drip system can cause dislodgement of emitters and too little pressure in a sprinkler system can reduce spray pattern efficiency.
To prolong the life of your greenhouse watering system, install an Irrigation Filter directly after a pressure reducer and install multiple in-line filters around the greenhouse pipe network taking into account the arrow which indicates the direction of water flow.
An irrigation filter traps debris and particles that inevitably get into the system and block the outlets of emitters. A high-quality HydroSure filter ensures emitters continue to efficiently output water for complete reliability when plants become bushy and large enough to disguise drippers giving you peace of mind when drippers are no longer visible. Adequate filtration reduces the risk of plants becoming underwatered because of emitter blockages.
How to Build a Greenhouse Drip Irrigation System
Using a drip irrigation system to water plants in a greenhouse is ideal to create conditions that allow plants to thrive. Micro Drippers ensure minimal water wastage through water runoff and evaporation as most of the water emitted from each drip head goes directly to the roots. Irrigating plants using micro drippers promotes adequate soil aeration whereas, capillary matting, drip trays and manual watering methods foster an environment for disease and pests. For healthy plants use a targeted and reliable watering drip irrigation system.
During the start of the growing season, plants inside a greenhouse are often young plants and seedlings. Micro drippers provide gentle watering with minimal soil displacement that is equally beneficial for newly established plants to the same plants that have become leafy and full of heavy foliage. At this point when plants are growing well, drippers can continue to emit water directly to the plant’s roots rather than becoming lost on the leaves. An overhead system, however, would simply water above the foliage canopy and eventually evaporate into the air.
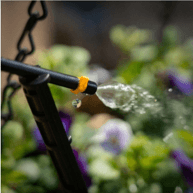
Adjustable Drippers: Use emitters with an adjustable function to tailor watering to individual plants and increase output as plants’ consumption requirements change as they grow larger.
Pressure Compensating: Ideal for greenhouse layouts with multiple elevations or shelving as output is the same from each dripper regardless of location.
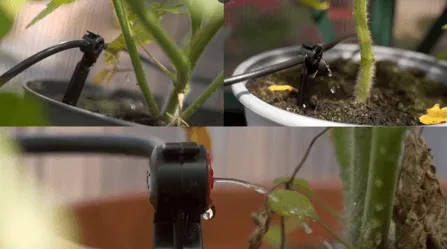
Installing a Dripper
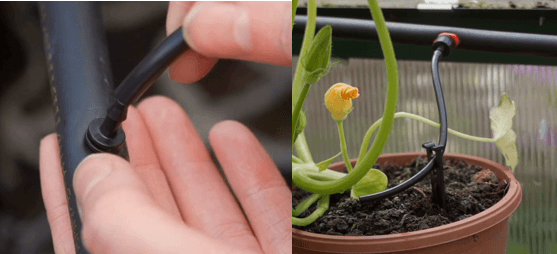
Drippers can be branched off from the main LDPE supply pipe using a 4mm Barbed Joiner.
Simply pierce a 4mm hole into the pipe wall using a Hole Punch and insert one outlet of the joiner. Alternatively, use a Ceta Dripper with a barbed spout where Micro Pipe can be installed, directed to the plant and secured in place using a Micro Stake.
HydroSure 6 Outlet Micro-Drippers are ideal for greenhouse watering as they can be installed into the wall of LDPE and six lengths of Micro Pipe can be directed to water individual pots.
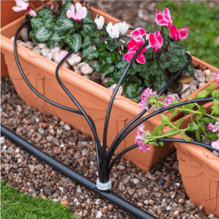
Drippers are pressure compensated so each length of micro pipe will output the same amount of water into each pot. These drippers are especially useful for reducing the number of drippers required in a system by replacing drippers with less expensive micro piping.
Umbrella Bubblers, Spectrum Sprayers and Stream Drippers are installed in the same way as micro drippers and are ideal for large pots and raised beds.

Greenhouse Watering Kits
For small greenhouses or when there is no access to an available water source, HydroSure has a range of Indoor Irrigation Kits that can be installed inside a sheltered greenhouse. HydroSure indoor kits arrive complete with a controller-operated pump that draws water from a water reservoir such as a Water Butt or Can.
HydroSure also has a range of ready-made Greenhouse Watering Kits offering the perfect solution to easily set up an automated greenhouse irrigation system with all the items needed without having to search around for individual components.
Using an Adjustable Dripper
Micro Drip System for Greenhouse
Adjustable Stream Dripper
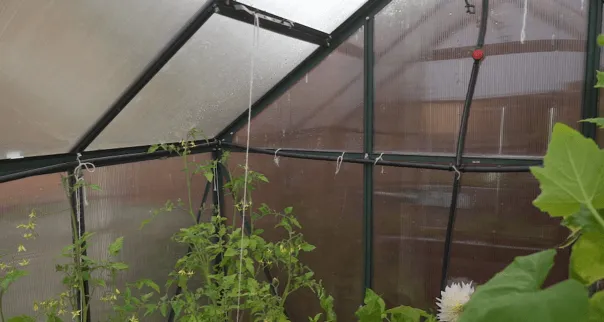
Mist and Overhead Watering Greenhouse System
An overhead sprinkler or misting system is ideal for watering young plants and seedlings with minimal foliage where overhead sprinklers can still get to the soil. Watering from overhead is also beneficial for mature and established plants with moisture tolerant foliage. It provides a highly cost-effective and efficient way to water multiple plants from a single emitter.
HydroSure's Mist Pattern Micro Spray emits a fine spray pattern useful for creating the right conditions when propagating seedlings or cuttings. The gentle watering minimises soil displacement whilst creating a moist environment that minimises disease and fungal growth. This also creates an ambient micro-climate for tropical plants that thrive on humidity.
During hot summer weather, the temperature inside a greenhouse can soar to unbearable levels detrimental to plant health. The micro-sized droplets that emit from a Micro Mist Spray system are less susceptible to evaporation making them ideal for cooling.
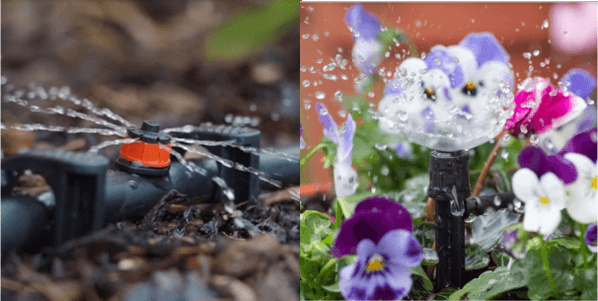
In comparison with micro sprays, Micro-Sprinklers put down large amounts of water at a high flow rate. Use micro sprinkler systems when watering greenhouse plants that require large amounts of water or when irrigating a large greenhouse.
HydroSure Inverted Sprinklers arrive complete with built-in support bearings functioning to protect internal mechanisms during constant rotation for minimal maintenance expertly engineered to reduce the need to replace the sprinkler head. Its ability to put down up to 100 L/h of water up to a 2.4m radius promises a reliable greenhouse watering solution for all plants in your greenhouse.
Top Tip: Run a mist micro-spray system once a day during hot weather to reduce the temperature inside a greenhouse. HydroSure also has an Adjustable Micro Spray with a built-in dial that allows you to control water output or switch off water flow entirely.
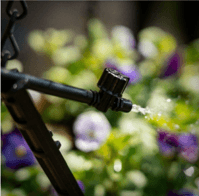
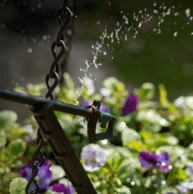
Greenhouse Irrigation - Micro Spray
Greenhouse Irrigation - Micro Sprinkler
Overhead Greenhouse Sprinkler System
Installation
Greenhouse sprinklers and sprays should be installed upside-down either directly into the overhead irrigation pipe or via a Rigid Riser. The emitter is then inserted directly into the riser/dropper using a push-fit or threaded connection. A longer-length dropper brings spray patterns closer to the foliage canopy for more targeted watering whereas, a shorter dropper is designed to control the internal climate and temperature. Depending on the spray pattern your chosen sprinkler or spray emits, each emitter should be spaced around 0.5 to 1 metre apart to ensure sufficient overlap of watering patterns. To minimise dry spots, the spray from one emitter should meet the location of where another emitter is situated.
For more garden watering tips, visit our Advice and Video Centre. We have all the information you need to help you build and design a bespoke irrigation system tailored to your plant's consumption requirements.

