The tilted design enhances water flow capacity and ensures reliable zone performance by minimising the risk of failure caused by blocked debris. See Full Description
The tilted design enhances water flow capacity and ensures reliable zone performance by minimising the risk of failure caused by blocked debris.
For Top Tips on how to connect solenoid valves to an irrigation controller and for information on how to design and build a garden sprinkler system, read our buyers guide.
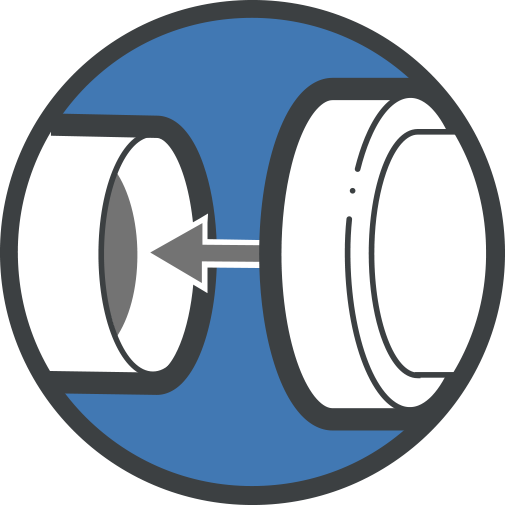
The unique tilted diaphragm creates a straighter water flow path than traditional style solenoid valves which require the water to change direction multiple times. This style of tilted piston assembly works to decrease friction loss and increases flow rate ensuring sufficient water pressure and flow is delivered to the watering zone helping each pop-up sprinkler to function at its optimal level.
Self-cleaning Screen
TThe debris tolerant design and straight water flow path creates a wide un-restricted opening that allows debris to move freely through the solenoid. This turbulent water flow path and positioning of the internal filter screen ensures water is aimed directly at the 50 mesh for self-cleaning action and a low-maintenance, longer-lasting system even when using water from a well or lake.
Plunger Solenoid
The solenoid is epoxy encapsulated for maximum moisture resistance ensuring longevity compared with moulded solenoids. The internal plunger moves upwards when electrical impulses from the irrigation controller are sent to the solenoid. This causes an imbalance of pressure behind the valve that forces water underneath the diaphragm causing the valve to open. The Pro-Series plunger is also captured within the solenoid minimising the risk of losing internal parts.
Manual Flow control
The rate of flow to each irrigation zone can be precisely adjusted using the removable handle. Not only does this feature allow for manual system start up operation but also prevents unwanted tampering or vandalism. The solenoid also features an internal and external bleed screw that permits manual bleeding of water from the diaphragm without discharging water outside the valve. Normally closed valve.
Durability
HydroSure, in partnership with K-Rain have manufactured a heavy-duty, corrosion and UV resistant PVC for a solenoid valve that is built to last and resist degradation over time. The bonnet screws are constructed using stainless steel removable using a screwdriver for easy servicing.
Installation tips
Begin by ensuring you have sufficient water flow, supply and pressure for the solenoids to work and flush the sprinkler system thoroughly before installation. When fitting the solenoid valve, use PTFE tape around any male threads and hand thread adaptors into the valve making sure they are not over-tightened. To operate the valve manually, open the bleed screw by turning it counter clockwise three complete turns. This allows water to exit the screw hole and opens the valve.
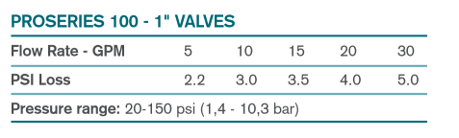
Specifications
Pressure Rating: 1.4 – 10.3 Bar
Flow Range 0.95 -133 LPM
Solenoid: 24 VAC 60 Cycle
Inrush Current: 0.43 Amps
Holding Current: 0.25 Amps
Height: 4”
Width: 3”
Length: 5 ¼”
Solenoid Valves Frequently Asked Questions
Which Irrigation Solenoid Valve Do
I Need?
If using a 9V/Battery Operated Controller, use alongside a 9V DC Solenoid Valve to ensure the current is enough to operate the valve. 9V DC Solenoids operate on a lower voltage and have much smaller coils inside the solenoid so should not be used alongside mains-powered controllers.
Top Tip: Contact a qualified electrician before purchasing and installing your components.
Why is my Solenoid Valve not
Working?
A solenoid valve that does not open or shut off water flow when required or is leaking indicates damage to the solenoid or valve. After switching off the water flow and power supply linked to the valve, check the following considerations are met.
Debris built up inside the valve’s internal mechanisms may be causing a blockage or preventing the valve diaphragm from operating as it should. Ensure the valve box is free from any dirt or weed growth clogging any vital mechanisms.
Check the water pressure and flow rate from the water source to the valve are within the range outlined in the product’s specifications. Too much pressure will cause damage and too little will prevent the valve from opening.
A valve may be prone to leaks if the O-ring between the solenoid thread and solenoid port is bent, twisted or perished. Turn your valve to the off position before installing a Replacement Solenoid.
Irrigation Solenoid Valve
Remaining Open
A valve that won’t shut off indicates a problem with the internal plunger where the port has become blocked or filled with debris preventing the plunger from dropping down into the valve. Often cleaning the solenoid port should rectify this problem. After cleaning the solenoid port, switch the solenoid valve off manually or at the controller level. If the valve remains open, the internal mechanisms will need inspecting and further cleaning.
For valves with built-in flow control, turn the flow control down until the valve does eventually close (usually this is achieved by turning in a clockwise direction). Once you have established the required level of flow, leave the flow control in this position. This should allow the valve to work correctly opening automatically when receiving communication from the timer.
Are Solenoid Irrigation Valves
Waterproof?
A solenoid valve should be installed in a dry Valve Box with adequate drainage that is not prone to flooding. This is to maintain the integrity of the valve over time protecting against the effect of thawing and freezing and the risk of electrical wires getting wet. Solenoid valves are designed to cope with some immersion of water, however, they should not be submerged for long periods. HydroSure Solenoid Valves are epoxy encapsulated and designed for maximum moisture resistance and longevity compared with moulded solenoids. Please Note: All electrical wires should be encased in a waterproof Electrical Connector with no exposed wiring – Consult a licenced professional during installation.
How to Replace a Solenoid Valve
The solenoid and solenoid valves are separate components. If the valve is not damaged, you can simply replace the solenoid.
Begin by shutting off any water/power supply to the valve. 2. The wires connecting the old solenoid to the system should be cut off at the connection point making sure to save as much wire as possible that connects to the system but dis-guarding any wire that has corroded or split. 3. Unthread the solenoid from the valve by turning the solenoid counter-clockwise. Once the old solenoid is removed, clean the solenoid port on the valve before installing the new Replacement Solenoid. 4. The new solenoid can be threaded into the solenoid port and rewired to the common wire and zone it controls. Ensure no copper wiring is exposed and each connection is secured using an Electrical Connector.
Top Tip: During this installation, take care not to get any dirt in the solenoid ports or cross-thread the solenoid which will hinder its function.
Why is my Irrigation Solenoid
Valve Not Opening?
Check the water supply is switched on and that there are no flow restrictions such as a closed valve or a leaking connector.
If using a valve with built-in flow control, ensure the valve is not closed/partially closed preventing water from reaching the sprinklers.
Most solenoid valves allow you to remove the valve bonnet. Before undertaking any maintenance, turn off the water supply to your valve box and drain the irrigation line. Then, remove the solenoid lid by unthreading the screws. Check if any grit or large particles have become lodged inside. The debris can be removed or flushed from the valve and the lid refitted.
A low flow rate or low pressure generated from the tap can cause a valve to remain closed. To combat this, manually open the valve using the bleed screw to allow water to run through. If the valve remains closed, this indicates an electrical problem and it is advisable to contact a licenced professional to carry out maintenance.