

How to install and use pop-up rotor sprinklers
A guide to installing an underground rotor sprinkler irrigation system. Learn the basics of sprinkler irrigation, how to lay the pipe for an underground system and how to calculate the correct correlation between flow rate and bar pressure for rotor sprinklers to function at optimal range.
This Guide Contains:
Calculating Flow Rate from the Water Source
Laying Pipe for an Underground Sprinkler Irrigation System
Creating Sprinkler Overlap for Healthy Plants
Considering Sprinkler Flow Rate and Average Transpiration To Calculate Run Time
Rotor Sprinkler Irrigation
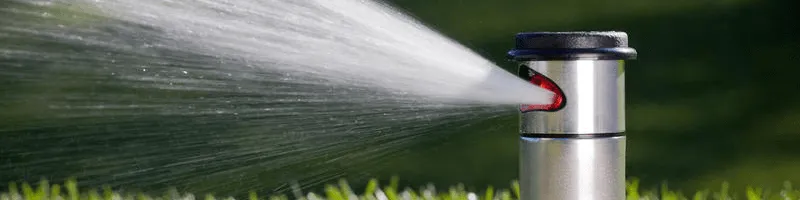
What is a Rotor Sprinkler?
Rotor sprinklers are often fully adjustable allowing for flexible watering and the capacity to deliver constant and uniform distribution from the nozzle outlet. The hydraulically operated internal mechanisms of the sprinkler feature a rotating turbine activated by the flow of water within the system causing the turbine to move. This activates the rotation of the internal gears from side to side prompting large streams of water to be outputted from the sprinkler nozzle.

Where to use a Rotor Sprinkler System?
Rotors distribute water using high pressures and throw water to a much larger radius than spray heads. An additional benefit of rotor sprinklers is their lower water output, also known as, precipitation rate. The rate rotors put down water make them the ideal solution for irrigating sloped or large gardens as they allow more time for water absorption into the ground. Often on sloped areas, putting down too much water too quickly will cause water to simply run to the bottom of the hill rather than sinking into the root zone where the plants need it most.
Top Tip: When irrigating more complex and intricate landscapes, use a combination of micro/drip irrigation collectively with an underground sprinkler system for ultimate watering versatility and water coverage.
Riser Heights
Rotor sprinklers are available in heights from 2” up to 12” risers. The height of the riser you choose depends on the type of lawn/plants you are irrigating. Closely mown grass, for example, requires riser heights around 2” – 6” and taller shrubs require a riser height of 6” plus. Make sure the height of the spray nozzle has enough clearance above the canopy of your plants when they are in full bloom.


Rotor Sprinkler Glossary
Low Head Drainage: Refers to water that has pooled and collected around sprinkler heads after the water supply is shut off. This undesirable water collection can be avoided by using rotor sprinklers with a check valve.
Uniform Water Distribution: A desirable outcome for a rotor sprinkler system. When water is evenly distributed, all plants/lawn areas receive the same amount of water removing the risk of flooded areas or dry spots caused by over or underwatering.
Matched Precipitation: Rotors with in-built matched precipitation means water output from each sprinkler is divided equally even if the arc or radius of the spray pattern is adjusted.
Reverse and Return: This refers to the continuous movement side to side of the riser when the system is in action. A good quality rotor sprinkler will have internal mechanisms that allow for this constant movement without wearing out over time.
Low Flow Application: A water-saving function some rotors have built-in. This application distributes water more slowly from the nozzle and at a more consistent rate. Use rotor sprinklers with low flow to minimise water runoff and allow water to seep into the root zone.
Rotor Key: A key manufactured for the adjustment of specific sprinkler rotors. Often rotor sprinklers can be adjusted using a flat-blade screwdriver but, for extra tamper resistance, some manufacturers will require the use of a key.
Ratcheting Stem: Located inside the ratcheting riser, the stem can be adjusted and aligned to the direction of the spray pattern often by simply turning to the required direction by hand.
Nozzle Tree: Most rotor sprinklers arrive complete with a tree of multiple types of nozzles. These can simply be torn off the nozzle tree and inserted into the rotor.
Arc Memory Clutch: A built-in reversing mechanism that prevents internal gear damage by returning the ratcheting riser back to its pre-set arc if the sprinkler is tampered with.
Full or Part Circle Rotor: Refers to the rotation of the arc between 40° and 360°. Often this spray pattern can be fully adjusted so the water does not overthrow the garden bed.
Pressure Regulation: Rotor sprinklers can have pressure regulation built-in and are often regulated to between 30 and 40 PSI. The internal regulators ensure water pressure and distribution is consistent throughout the system regardless of the location or elevation of the rotor.
Start Position: This refers to where the sprinkler starts rotating from and is often either from the left or the right depending on the rotor.
Gear Driven Rotor: Internal mechanisms within the rotor are powered by water as it flows through the system. The sprinkler rotates the riser at a constant speed meaning water is evenly distributed from the nozzle.
Side Inlet: Rotor sprinklers with a side inlet often have the option of a bottom inlet too. One inlet can be plugged in whilst the other is in use. Side inlets allow the user to have a taller sprinkler riser yet reduce labour during installation as pipe can be installed closer to the surface.
Rotor Key: A key manufactured for the adjustment of specific sprinkler rotors. Often rotor sprinklers can be adjusted using a flat-blade screwdriver but, for extra tamper resistance, some manufacturers will require the use of a key.
Positive Riser Retraction: Often when dirt builds up within the internal mechanisms of the rotor, the riser does not return back inside the sprinkler canister. A rotor sprinkler with positive riser retraction features a robust spring that pulls the riser back inside the sprinkler once the water is shut off.
Check Valve: Rotor sprinklers often have a built-in check valve activated when the water supplying the system is switched off. This water-saving function holds water within the system preventing it from leaking out and pooling around sprinkler heads located at the lowest point of the system.
Calculating Flow Rate from the Water Source
Before planning to set up and install an underground pop up sprinkler system, the most important first step to ensure plants thrive is to calculate the available water and the bar pressure from your tap/water source. Then, take note of the performance data regarding the rotor sprinkler you are using and use this in your calculations.
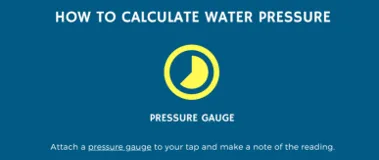
Water Pressure
Most domestic pop-up sprinkler systems operate at bar pressures from 1.7 to 4 bar depending on the type of pop-up sprinkler and nozzles used in the system. Use the below method to calculate water pressure from your tap or faucet. Alternatively, your local water board can supply this information.
Too Much Pressure: Pressure higher than the pop-up sprinkler is designed to function means the water jet begins to mist and water drifts away with the wind rather than being applied to your plants. A correctly functioning rotor nozzle should output large droplets of water that are more resistant to wind drift. This is the most effective way to water your garden. Maintaining the correct bar pressure is easily managed by installing a Pressure Reducer at the start of the system.
Too Little Pressure: You might measure your pressure and realise you have enough pressure to run a sprinkler system from your outside domestic tap however, as you add more pop-up sprinklers and extend the run length of pipe, this reduces the bar pressure within the system. As the pressure deteriorates through the expansion of the system, the internal mechanism of the pop-up does not have enough force to lift the riser out of the ground. It is, therefore essential to use rotor sprinklers that do not require higher pressure than your supply.
Irrigation Filters: Always install a filter upstream from the rotor sprinklers to minimise the risk of clogging or damage caused by debris build-up.
Zoning a Rotor Sprinkler System
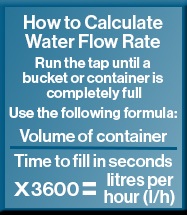
Use the below calculation to determine water flow rate from your tap or chosen water source.
Domestic water pressure outputs around 9 litres of water per minute and 540 litres per hour. If your rotor sprinkler’s flow range is around 180 litres per hour, your sprinkler system will be able to accommodate 3 rotor sprinklers at an optimal level (divide 540 by 180). This number appears quite low but additional rotor sprinklers can be added if you divide your system into multiple Irrigation Zones. Use an Irrigation Controller to control each zone individually for a fully automated system.
To calculate how many zones are required for your system, calculate how many rotor sprinklers are required and the total of litres per minute all the rotors will use combined and divide this by the amount your tap/faucet outputs.
Friction Loss: As water travels through a pipe, the flow is slowed due to the friction generated. Factor this into your calculations by taking 20% off the flow rate from your tap.
Precipitation Rate
Precipitation rate refers to the amount of water, measured in inches, put down on the ground. Use rotor sprinklers with the same flow and precipitation rate in each zone. Take into account that a 180° rotor will have double the precipitation rate of a 360° nozzle as the riser mechanism can cover a 180° pattern faster than a 360°. In these instances, use a higher outputting nozzle for full circle patterns and nozzles with a lower output for half and quarter circle patterns.
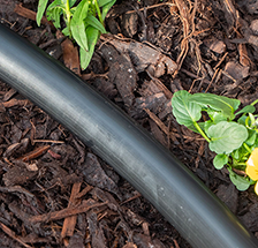
Laying Pipe for an Underground Sprinkler Irrigation System
Rotor sprinkler irrigation systems are high volume systems designed to be installed underground. A rotor sprinkler system can be discreetly installed below the surface making it an almost invisible way to water your lawn or garden beds. This watering solution avoids unsightly pipe networks being on show and lets your beautiful plants take centre stage.
1. Planning the System
Begin by sketching a plan of your garden and draw where you intend to place your rotor sprinklers, pipe network and connections. Make a list of all the items you will need to build your irrigation system.
Top Tip: The best way to plan your system is to mark your garden using markers such as pots or rocks to indicate sprinklers or connectors and string to indicate pipe. Don’t forget to measure the distance your sprinkler will throw and allow for plenty of spray pattern overlap. Sprinklers should also be as evenly spaced apart as possible to ensure uniform water distribution.

2. Preparing the Ground

Once you have chosen where to place your pipe network and rotor sprinklers, dig a trench about 6-12 inches wide and deep. Be sure to carefully lift the turf keeping it as intact as possible.
Top Tip: Use waterproof sheets to stack the ground retrieved from the trench to avoid damage to the rest of the lawn.
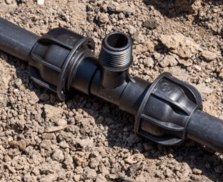
3. Installing the Pipe Network
Often MDPE or HDPE pipe is used to install a sprinkler system and occasionally LDPE pipe is used for small domestic systems. To maintain the integrity of the pipe and build a long-lasting system, you will need to uncoil it correctly. Work together with a friend to uncoil the pipe making sure it does not kink and weigh it down either end with a brick for one hour preferably on a sunny day. This process lets the pipe settle making it easier to work with.
LDPE Pipe: Use Barbed/Nut Lock Connectors to direct pipe around corners and divert different ways. Threaded Barbed Connectors can be used where you would like to install your rotor sprinkler. Top Tip: Use Ratchet Clamps to secure pipe onto the barbed connections to prevent pipe blow off whilst the system is in action.
MDPE/HDPE: Use Compression fittings that fit the external diameter of your pipe to direct pipe around your garden. Threaded Compression Fittings should be installed where you would like to place your rotor sprinklers. Compression Fitting Guide. Top Tip: Rotor sprinklers often feature a ½” or ¾” inlet that can be attached to threaded connectors.
Don’t forget to install an End Piece at any open end of the system to maintain pressure for rotor sprinklers to function optimally.
Connect the pipe network to the water source and run water through before installing your sprinklers. This process flushes out any dirt or debris sitting within the pipe that may have got in there during installation and will clog the internal mechanisms of rotors. Allow water through the system for 2-5 minutes ensuring enough time to sufficiently flush it through.
Very importantly – Ensure connections are watertight and securely fitted! Any loose connection can work its way free from the pipe causing an underground leak. Check the pipework is all intact and the system is watertight.
Rotor Sprinkler Installation
Installing a Rotor Sprinkler
Rotor sprinklers can be installed directly onto the threaded outlet of a Compression Fitting, Nut Lock or Barbed Connector.
Alternatively, for more flexibility when placing your rotor sprinklers, connect the Swing Pipe to the threaded outlet of your connector. This installation method using flexible pipe can reduce the impact of lawnmowers and footfall by cushioning the weight and acting as a shock absorber. Top Tip: Use PTFE thread around male threads for a watertight connection.
Swing pipe is easily installed to a compression fitting using a nut lock connector.
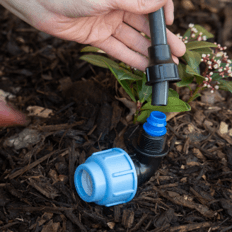
Simply remove the tapper from a nut lock fitting and push it into the centre channel of a ¾” male threaded compression fitting outlet. Install the nut, tapered edge first, over the swing pipe and push the swing pipe onto the barbed outlet of the tapper. Tighten the nut for a watertight connection between MDPE/HDPE and flexible pipe.
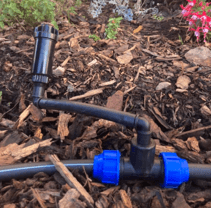
Alternatively, install a sprinkler from a Compression Fitting using barbed connectors. Install a Male Threaded Elbow to the female outlet of a Female Threaded Compression Tee followed by a length of Swing Pipe and another male threaded barbed elbow connected to the sprinkler.
Few connectors can allocate for the installation of a 90° spray pattern. This method provides a solution for sprinklers to be directed to a corner from a length of flexible pipe.
Drain Valves: Designed to be installed at the lowest points of the system and at the bottom of a run of sloped pipe. Drain valves function primarily to prevent the effect of thawing and freezing that causes damage to pipework and rotors and acts to flush the system when not in use. Our HydroSure Drain Valve features a barbed inlet so can be installed using LDPE pipe or adapted to MDPE/HDPE systems. Top Tip: Install the Drain Valve inside a Valve Box on top of a layer of gravel. These conditions aid water drainage and allow for easy accessibility during system maintenance.
Important: Check the system is watertight walking around checking each sprinkler and connection. Once checks have been made, the soil can be backfilled and a new lawn can be laid.
Repairing a Leak in an Underground System
Occasionally, an underground pipe can degrade or become damaged. This can cause a leak in your irrigation system. It is important to fix any leaks to maintain an efficiently working system and to prevent water wastage.
Locate a leak in a system by checking for wet spots or water pooling. This indicates where the pipe may have split or a fitting may have come loose. Another indication of a leak is hearing water leaking/hissing even when the system is turned off.

Look out for any zones in your system with low pressure or where the sprinklers are not working at their peak. If you are using a controller or timer with multiple outlets, you can turn zones on or off to help you determine where the leak is. Once you have located the leak, dig out a trench deep and long enough on either side of the pipe.
Use Pipe Cutters to cut away the damaged area of the pipe trying to save as much pipe as possible. Next, attach a Compression Coupling to bridge the gap between the two pipes to mend the leak and create a watertight connection.
Creating Sprinkler Overlap for Healthy Plants
Head to Head Watering
Head-to-head watering is a vitally important installation technique used to eliminate the risk of dry spots and having to manually water areas your sprinklers miss because of poor sprinkler placement. Sprinklers should be spaced evenly so the sprays overlap. Creating a 100% overlap of sprinkler output means the beam from one sprinkler meets the location of where another is in situ. Calculate the throw distance from each sprinkler and measure accordingly to achieve head-to-head watering. It is important to note your sprinkler may not be capable of outputting the maximum throw distance/radius on the manufacturer’s performance chart due to wind drift and pressure loss within the pipe. Take this into account and correctly measure the radius the sprinkler in your situation can throw to and create a spray overlap that ensures even distribution of water droplets eliminating any risk of brown patches or un-watered plants. A good design with plenty of overlap with for example, between 8-10 sprinklers is more cost-effective than a bad design with fewer sprinklers.

Check for Even Water Distribution
Once you have adjusted rotors to the required spray pattern and the outlets are all pointing in the right direction, it is important to check water is being put down exactly where it is needed. Place cups around your lawn or garden in the direction of sprinkler output and run your system for 10-15 minutes. After this time, check to see how much water is in each cup ensuring there is an even amount in each. This technique minimises dry spots and over-watering.

Considering Sprinkler Flow Rate and Average Transpiration To Calculate Run Time
The below formula will help you work out how long you need to run an underground sprinkler irrigation system. Some irrigation controllers may ask for the below information to automatically modify irrigation to ensure plants receive just enough water to thrive whilst minimising water wastage.
Average Transpiration: Must be compensated for when calculating how often and for how long to water your plants. It refers to the amount of water plants release from their leaves. This water loss needs to be replaced so plants can continue to grow and draw water into the roots. The average rate of transpiration in the UK is 4.5mm a day. If you are running your system for 20 minutes three times a week and aiming to put down an inch of water each time, factor this into your system run time.
Please Note: Transpiration from plants will increase during warmer weather, up to around 10mm, so system run time will need to also increase.
Time: It is highly unlikely that you will need to run a sprinkler system for an hour but, sprinkler output is usually calculated in litres per hour so we must multiply the average transpiration in millimetres by 60.
Output from Sprinkler: This is usually calculated in millimetres per hour (mm/h) and can be found in the user manual of your sprinkler. Please note: Precipitation rate is different to flow range.
The answer you get from using this calculation will give you time in minutes to run your irrigation system.
Top Tip: Transpiration from plants will increase in windy conditions. The formula does not account for the current of air so you will need to adjust your system accordingly. Use nozzles with lower precipitation rates and space sprinklers further apart when installing on a slope and space sprinklers closer together in more windy areas to allow for wind drift.
Sprinkler Run Times Vs. Soil Type
The average time to run a rotor sprinkler system is for 30 minutes three times a week. During periods of extreme heat, the run times may need to be increased due to evaporation and heat stress.
Top Tip: Cover the soil around beds and borders in a layer of mulch to prevent evaporation and water early in the morning or late evening to allow water to remain within the root zone for longer.
Often the type of soil you have in your garden can determine how long to run your rotor sprinkler system. Soil is made from a percentage of clay, sand and silt particles and different soil types have different ratios of each. This impacts the amount of water the soil can hold and keep readily available for the plant’s roots.
Sandy Soils: Allow water to seep into the soil quickly minimising runoff meaning water can be put down quickly and it still absorbs into the ground.
Clay soils: Retain water readily available for the plant’s roots but, require longer for water to seep into the soil. Clay is prone to surface runoff so water needs to be put down slower.
The below table indicates how soil types determine the water application rate.

Rotor Sprinkler System Maintenance
Cleaning a Rotor Sprinkler
Over time, a rotor sprinkler’s internal mechanism and nozzle can become naturally clogged with dirt or debris. Allowing debris to build up can cause dry spots and sprinklers fail to pop up leading to plants becoming under irrigated. By carrying out simple system maintenance, sprinkler malfunction can be avoided which in turn allows your rotor sprinkler system to function optimally and conserve vital water resources. The below process should be carried out once a month during the watering season.
1. Begin by removing any overgrown grass around and below the sprinkler cap by gently using a trowel being careful not to damage the sprinkler head.
2. Use a rotor tool specific to your rotor sprinkler to lift the rotor head. Some rotors require only a flat-blade screwdriver to lift the riser. Check the rotor’s instruction manual for this information. Turn the radius adjustment screw to remove the nozzle.
3. Clean the nozzle port and rinse the nozzle under running water.
Internal Mechanisms
1. Access the internal mechanisms by turning the twist cap on top of the rotor until the internal assembly will lift out from the sprinkler canister.
2. Remove the filter screen, located at the bottom of the internal riser, by grasping the centre pin with a pair of plyers and pulling it out. Clean the filter under running water and place it back into the riser.
3. Reassemble the rotor sprinkler and realign the spray pattern by turning the ratcheting riser in the direction of flow.
Top Tip: Always twist the riser rather than the turret top when aligning the spray pattern and follow user instructions when disassembling your rotor sprinkler to avoid damage.
Winterising a Rotor Sprinkler System
Draining down a rotor sprinkler system for winter is a vitally important process for protecting delicate irrigation components and minimising damage caused by thawing and freezing if water is left sitting within the pipes.
If a rotor system is not winterised, water within the pipe expands as it freezes and causes the pipe network and rotor sprinklers to crack or become brittle under the pressure.
There are three ways to drain down your rotor system before the temperature plummets to below 0°. With all drain down methods, the water supplying the system will need to be switched off.

Manual Drain: If an automatic drain valve is not installed within your system, you will need to manually drain the system by turning on each valve to allow the water to escape. Lift the riser of each sprinkler head and disassemble to remove any sitting water. Use an absorbent cloth/sponge to clear any excess.
Automatic Drain: Systems with a drain valve installed will automatically drain the system each time the water supply is shut off. During winterisation, unscrew the cap/open the drain valve taking care as this cap is often pressurised. Leave the valve open so all the water drains out and replace the cap after 24 hours. Similar to manual drain processes, each rotor will require disassembly to remove any sitting water. This is especially apparent if using rotor sprinklers with a side inlet.
Air blow out: Ideal for larger scale and commercial rotor systems, this process forces air through the system that essentially blows out the water. It is recommended to hire a trained professional if choosing this process as the air volume and pressure required is very high and can be dangerous.

Pooling Water Around Sprinkler Site
• Underground systems require frequent flushing to prevent dirt within the pipe network from clogging the nozzle or damaging the seal between the riser and sprinkler body. If your system has had recent repair work/system alterations, debris may prevent the riser from lifting. Flush the system and clean the rotors if necessary to remove any sitting sediment.
• Any damage to the riser caused by a mower or footfall will cause mechanical malfunction and disfigured spray patterns. Check each nozzle and turret top of your sprinklers to ensure they are intact.
• The area around a sprinkler site may become boggy/waterlogged indicating a loose connection between the swing joint/fitting or a break in the pipe network. To repair a leak use a Compression Joiner/Micro Joiner depending on the pipe used or install PTFE Tape around any male threaded connection to ensure a watertight seal.
• Water leaking from sprinkler sites even when the system is switched off indicates a problem called low head drainage. A pop-up sprinkler with a Check Valve will prevent water pooling from sprinklers installed at the lowest elevation.
Sprinklers Not Working the same as when Purchased
• Over time a sprinkler may experience a build-up of sediment and debris that blocks the nozzle outputs or damages the riser retraction mechanisms inside the sprinkler. Flush the system and clean out the rotor sprinkler as explained in our Sprinkler Maintenance Guide.
• Prevent debris build-up by installing an Irrigation Filter at the start of the system.
• Alternatively, leaking connections or a pipe supplying the sprinkler may have split. The water lost from connections that are not watertight will cause pressure loss and reduce performance.
Leaking Pipe Connections in Underground Irrigation System
An area that is boggy or waterlogged indicates a leaking connection or a pipe that may have split. Most connection points can be tightened by hand or by adding two wraps of PTFE tape around male threads or replacing connectors that overtime, have snapped.
When fixing your pipe network, depending on the pipe you are using to supply your system will indicate the type of connector you need to repair the damage.
LDPE Supplied Systems: Read our Repairing Damaged LDPE Irrigation Pipe Guide.
MDPE/HDPE Supplied Systems: Read our Repairing a Leak Using a Compression Coupling Guide.
My Sprinkler Does Not Cover the Range/Radius Outlined in Specifications
• A variation in flow rate or pressure drop from the water source will also reduce the performance of sprinklers – Check the flow rate from your tap remains high enough during the time of day your system is set to run using our Calculating Flow Rate from the Water Source Guide.
• On windy days, the spray pattern from your sprinklers may alter even when using nozzles with built-in wind resistance. Alternatively, running a system at a bar pressure that is too high, will create misting – Consider installing a Pressure Reducer regulated as specified in the sprinkler specifications to minimise spray pattern wind drift.
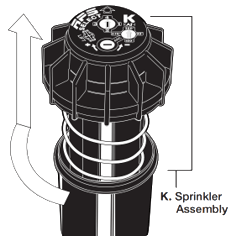
How to Lift the Riser of a Pop-up Sprinkler?
To lift the riser of a rotor sprinkler, most require a Key inserted into the turret top of the sprinkler to lock into the mechanism and allow easy uprooting of the riser by hand. Any maintenance or switching of nozzles is often carried out in this way. Alternatively, ask a friend to switch the system on manually and catch the riser as it lifts during system operation.

